November 20, 2006


Oh Bugger!

We went down to the boat this weekend to sort out some interior details. A neighbor of the dock owner told us the bad news that another boat on the dock had come undone during the high winds we've been having recently. The other boat sat across our bows for a few minutes. Bashed in the foam false bows, ripped off the anchor roller, and really busted the forward cross beam.

We have lots of structure left so the boat isn't going to fall apart but it's going a mean a trip to the shipyard to get damage that is near the waterline fixed properly. Insurance should cover everything but it's a pain to have this happen...

October 29, 2006


We have paint.
(ta-dah!)

We now have some primer on the cabin. It looks much better than I had thought, now that the fairing compound is all covered up. Lots of little pinholes, a few areas where it isn't very fair, but overall I'm quite pleased. It also decreases the "visual bulkiness" of the cabin to have it painted.

Today I was sanding the primer. Nice high build epoxy, but it's hard stuff. I'm using 150 grit and it eats discs pretty fast. But it's very smooooth when you do sand it. Very nice tactile feel on the rounded corners. Thank god I don't have to sand the whole cabin top (which will be non skid) because it's half the surface area of the whole cabin.

The cockpit shot here has the battery box/see over the cabin step/bench seat shown.

August 13, 2006


Finally the adjoining boat is out of its slip and I got this good shot of the boat with windows in place. Fairing is coming along well and I hope to paint in about 1 month... (famous last words)

July 21, 2006


The view...

So how should we paint her? Stylized waves running down the hull? Something more abstract? It is never too early to think about painting - especially if you have an extreme negative reation to the thought of living on a blue and white boat. In searching for inspiration Ev found me some boat owners who think like me. Go to their photos page and click on May's "Pimp My Ride."

July 20, 2006

ONE YEAR LATER


It’s been a year since we hauled out and chopped up the boat. Progress has been steady and expensive (but thanks to ebay we're still below budget.)

Ev is taking the week off to work on the boat and I gave up the glamour of the writing life for a few days and got dusty and dirty too.

We decided that our goal of being sailable by September was stupid. The boat may be ready to go out by then, but the amount of work needed to clean her up and drag all of our belongings out of the lockers and bilges makes the idea very unappealing. I would rather go hiking - and save unpacking and cleaning the boat until it is completely finished.

We are also rapidly moving into detail work. There are very few large holes left to chop in the boat - so after the hatches are in it is time to work on the finishing details. Ev’s been fairing for weeks and looks forward to painting the cabin. I want to make curtains but I think installing the scuba compressor (yay! Ev came up with an ideal place), hooking up the engine, redoing the rigging, building a table, ripping out the galley etc need to come first. Ev suggested the fun home project of building an 18' sea anchor to ward off writer's block though...

Windows Windows!

We have windows. And hatches. After agonizing over the shape we drew them on yesterday and made the cut. It sure changes her appearance. Ev and I will attach the windows this weekend. The view from the forward salon seats is awesome.


July 13, 2006

More GV10 dinghy progress. Glassed inside hull and frame seams last night. Another 4-1/2 hours of work. It was really hard on my back - because the hull is on the floor and I have to bend over to get at the inside seams. This is the hardest part of stitch and glue boat building for me.

Total time spent: 11-1/4 hours. Going fast so far.

June 27, 2006

GV 10 dinghy progress - moved from my long suffering friend Cheryl's basement to her garage to build the dinghy. Stitched the hull together tonight. 1-3/4 hours.

Time to date: 6-3/4 hours.

Progress on the big boat continues as well. I have got the carbon chainplates all glassed in and hopefully watertight. And I've started work on what has to be one of the few carbon / nomex outboard motor brackets around.

One of the few times I've had to say that "stupid previous owner". He liked to fasten down hardware with through bolts that are embedded in epoxy. This cam cleat has machine screws about 2" long epoxied into a solid mahogany backing block. Heating them doesn't really help because if they get too hot they melt the cleat. Boiling wasn't hot enough. So I'm drilling down around the cleat through the remnants of the deck and backing block and will have to chisel the piece off. A nice hour long job.

June 5, 2006

I've started building my GV10 dinghy - the tender for the big boat. I sell plans for it here:
http://boatplans-online.com/proddetail.php?prod=GV10

Tonight's progress:

- mark out all the panels and frames
- cut them out
- glass 3 of 4 of the hull panels and 1 of the 2 frames. Just didn't have enough epoxy. It's all on the big boat where I have gallons of the stuff.

5 hours to date

June 3, 2006

Chainplates under way

For the past year the rig has been held in position with short lengths of rope to the rigging wires turbuckles. This has been because we raised the mast so the boom would clear the new cabin. But the mast is rather "loose" and bounces around a lot when a big wake hits the boat.

But now, f
inally, the chainplates are going in. This will be nice as summer (and the jetskiers and wakeboarders) approaches so I can properly tension all the rigging.

You first start with about 30m of carbon fiber unidirectional fabric 300mm wide.


Laminate this over a stainless steel pipe that is suspended in mid air. When hard, cut into individual chainplates. This is hard work - the thick walled s.s. pipe was way overkill (but it's i.d. happened to match the clevis pin diameter). Note to self - next time use just a thin s.s. bushing.

It took 2 hours to cut 3 slices and form the four chainplates into these:


May 15, 2006


Interior work is going well. Another weekend and the settee will be mostly done. Just have to slap a bit of paint on it to cover the lovely carbon fiber bits. Oh, and install drawers under the seats.
That comes later I think.

For after this, it's on to some long delayed carbon fiber chainplates. I have now used up ~70 gallons of epoxy + hardener.

Ignore the patchwork effect. Some of the panels are coated with a white plastic film and some are black carbon fiber each side. Make for a bit of a muddle until it's painted.

April 30, 2006

The Interior work: Time for an update. It's been 3 weekends of working on the interior (about 25 hours total). I now have a wet locker built, and the settee well underway. The carbon/nomex panels I am using are both a joy and pain to work with.

The pain is the itch and the splinters: carbon fiber dust/shards are worst - worse than fiberglass dust, aluminum shavings in the skin, tiny bits of copper wire. I've had them all in my fingers and carbon hurts the most. There is also a "Tedlar" film coating on a lot of these panels. It's a plastic film that has to be sanded off before bonding anything. It eats sanding discs.

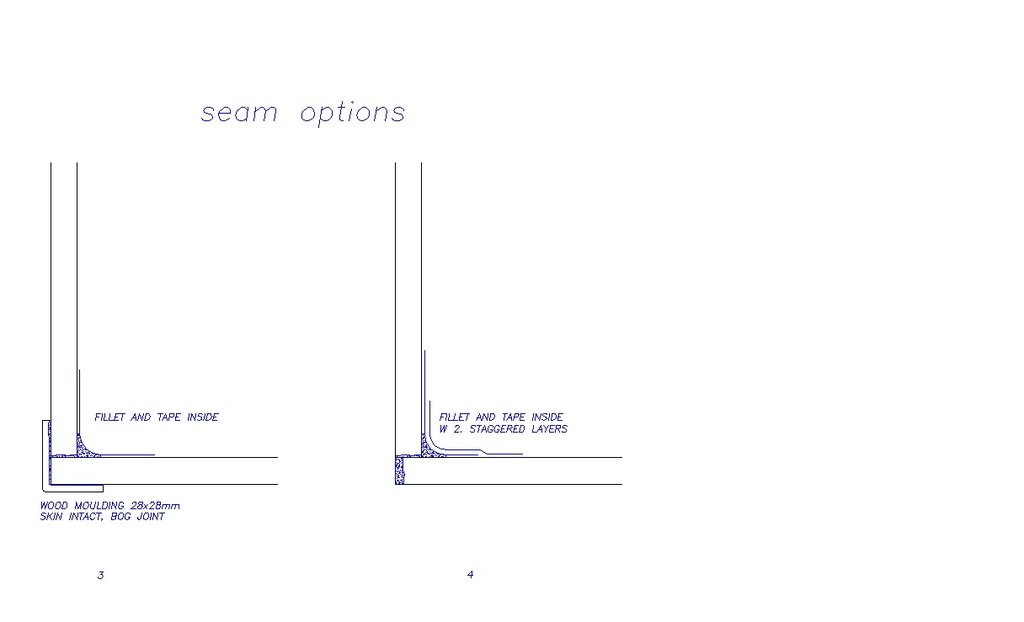
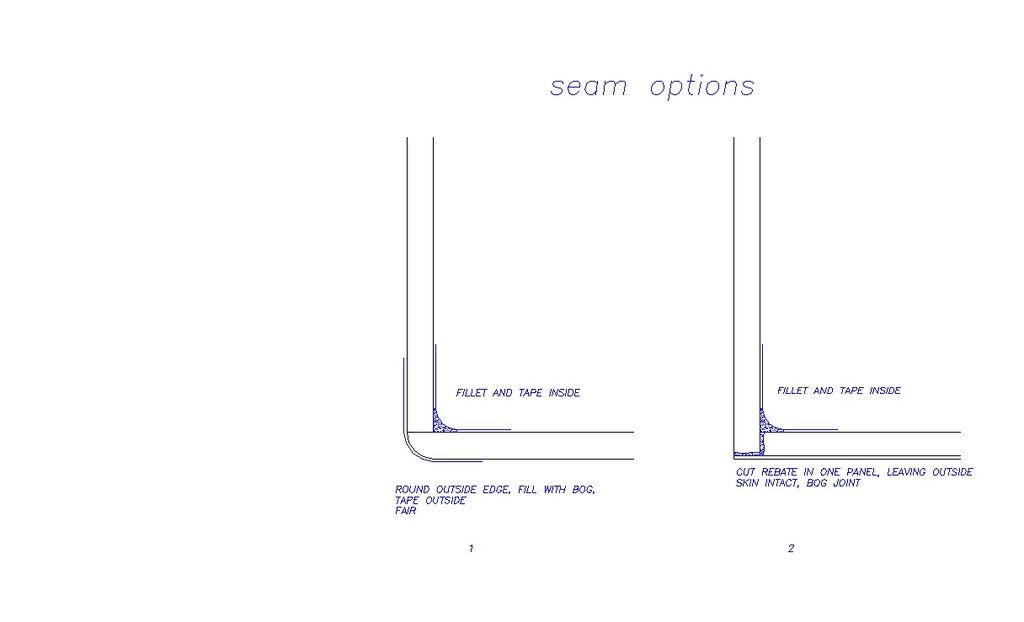
The joy is the results of working with this stuff. To make a rounded corner, you just cut off the inside skin (width depends on the angle you want); fill the exposed core with bog, and fold. It's like magic and makes the most beautfil little rounded corners that would otherwise take hours and hours of fairing to make. It's so stiff that only minimal clamps and jigs are required to hold stuff in place.

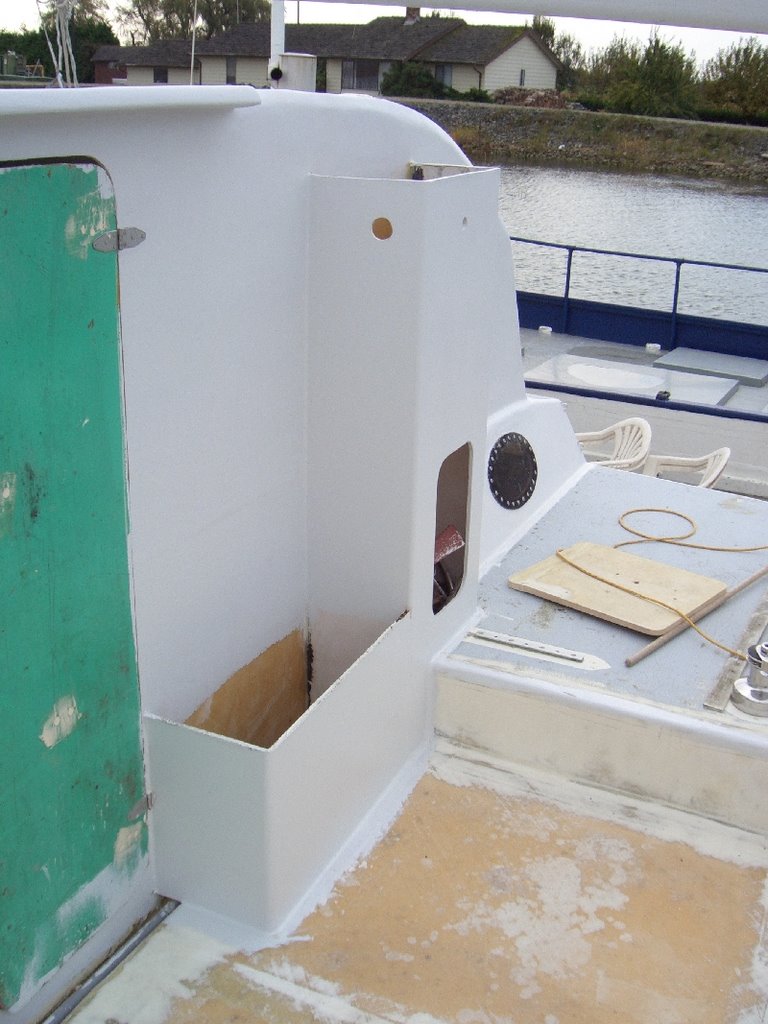
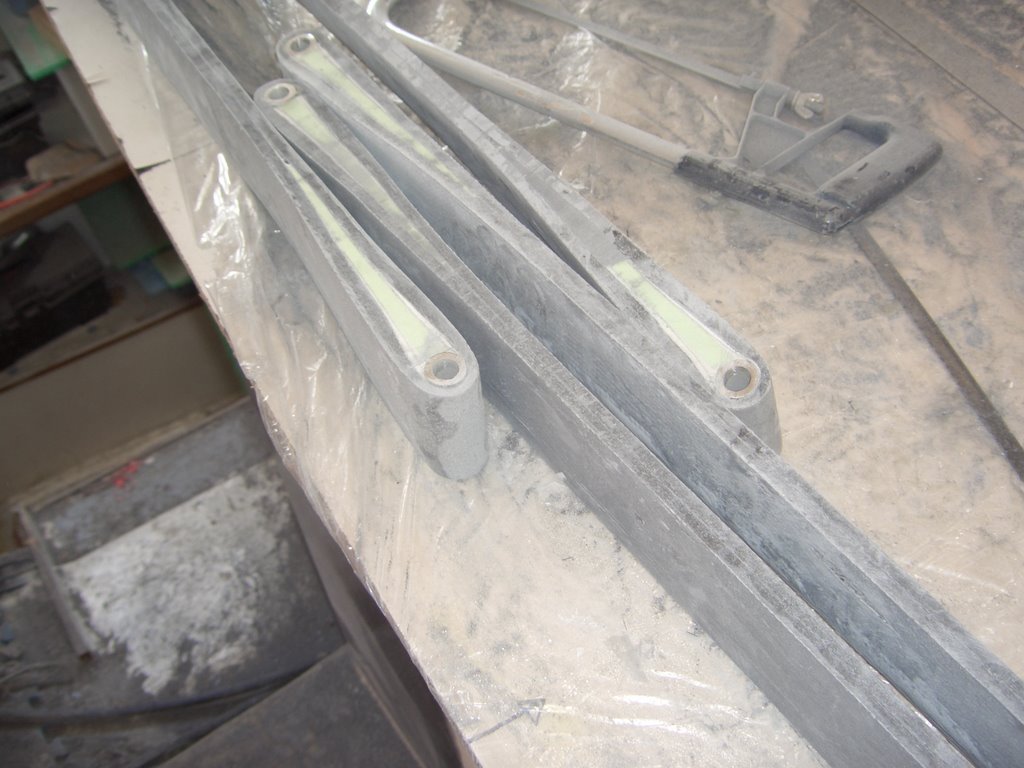
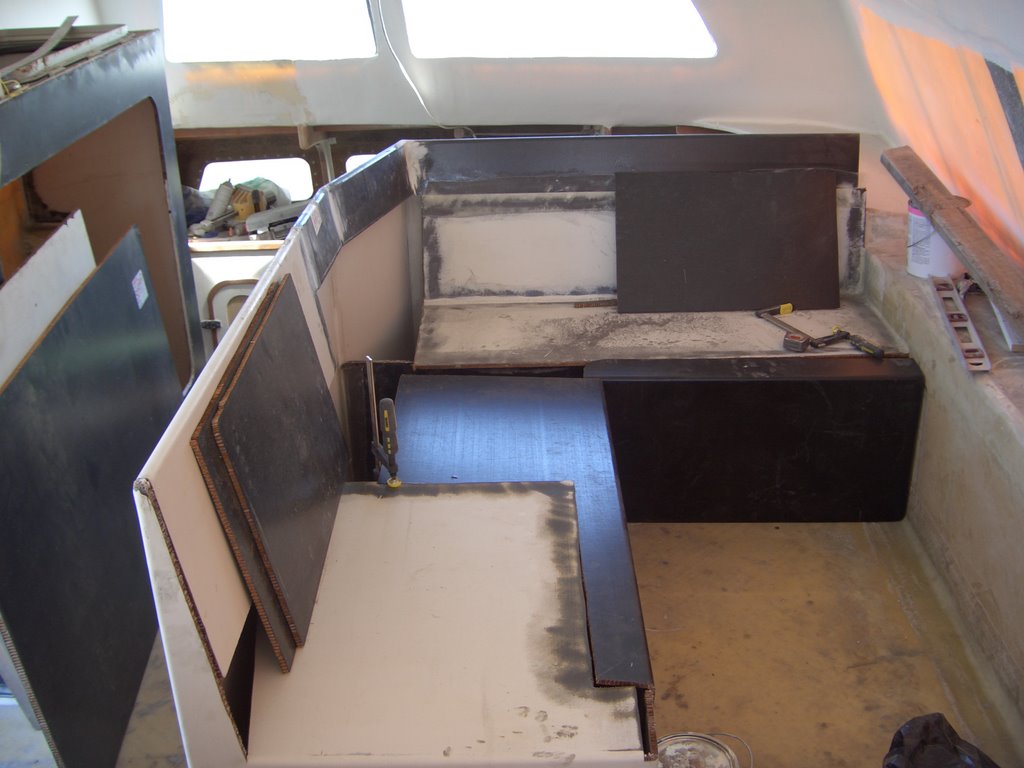
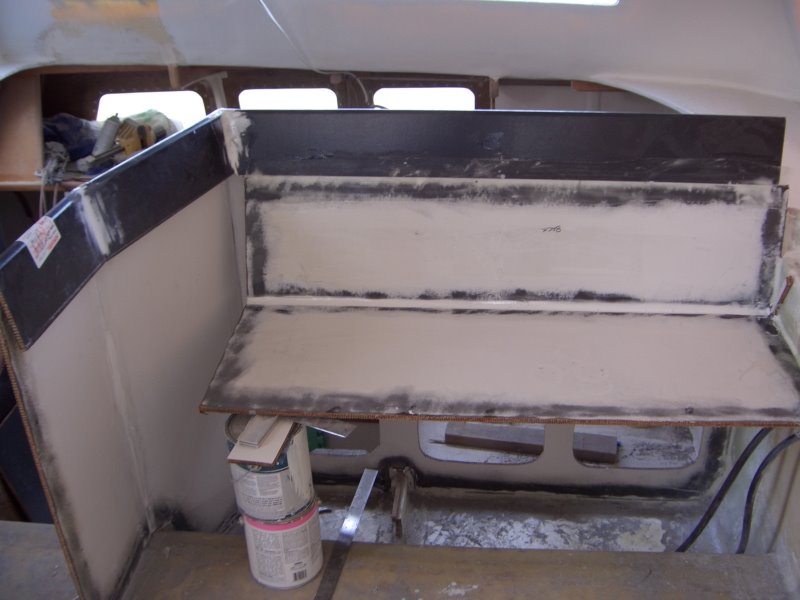
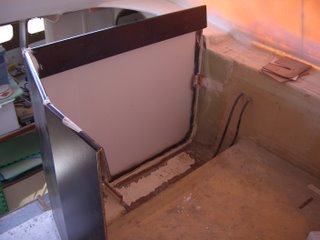
Here's a few pictures: The first one is the port settee back (and also the inside of Maia's bookcase which will have openings on the other side of the panel)


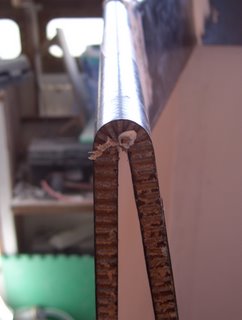
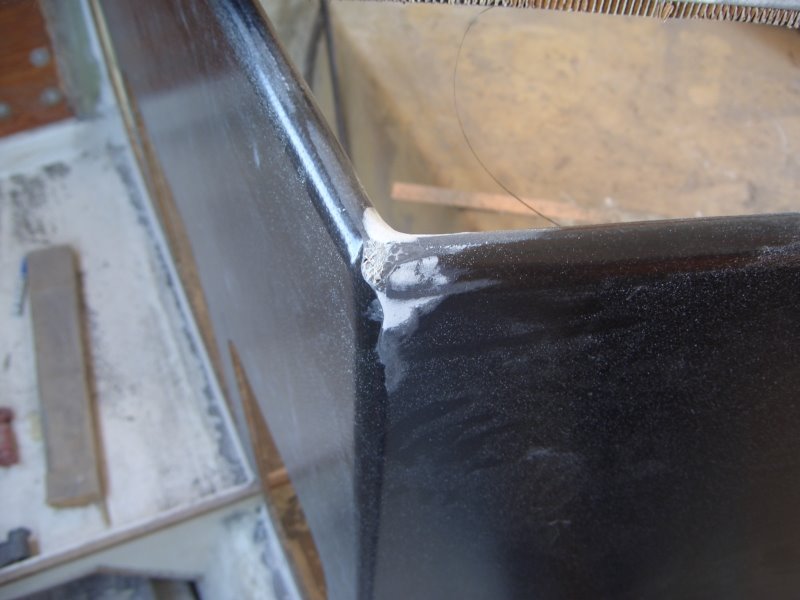
Here is a very nice corner that will form the top of the seat back. Thin enough to grab onto as well. Beautiful isn't it?


The next picture is what I call"the holy grail". I admit it; I'm a wood butcher so real wood cabinetry is beyond me. But this stuff makes it so easy. Here's 3 rounded edges that meet in one corner. Just a tiny bit of bog on the very corner and it will be perfect....


And here's part of the seat in place. You can see the openings for Maia's bookshelf underneath. The above pictures represent 10 hours of work.

April 3, 2006

I haven't been out at the boat much lately - too busy writing about it to visit. I went out the other day to pace out the cabin with Evan. We worked out the dimensions of the wet locker, sorted out the settee arrangement, and decided how to arrange my office space. We even decided on some 'built-ins' - planning some integrated bookshelves and cubbies into the furniture.

It looks like the furniture will develop quickly. The carbon nomex panels are so easy to use; building furniture is more like an exercise in origami than cabinetry. Evan just makes slices on the inner skin and folds it into shape. The resulting curves look like they came out of a mould.

My goal of a summer sailing holiday may not be the pipe dream I initially thought it was.

March 25, 2006

I'm painting, I'm painting


Finally the inside cabin seam fairing is ended (for now). I've got a coat of primer and paint on most of the inside of the cabin bulkheads and sides. Looks pretty good but needs 1 more finish coat. I wasn't trying for a smmmmooooth inside finish. I believe in honesty in my materials or "you can see the fiberglass weave". It's not that I'm lazy, nope, it's a design philosophy.

You can still see the foam core because there is no outside paint on the deck. The places that are missing paint are where other things will be bonded to them. No sense in painting something just to sand it all off...

I've been getting a lot of suggestions for the construction of the interior furniture. I'm using surplus carbon skin/Nomex honeycomb cored panels. My mistake was thinking of them as the same as bits of plywood - but they're not. If you think about removing the inside skin at corners you can bend them into all sorts of nice shapes in one go. Eliminates a ton of work (I hope). I just have to figure out how to do a few of the other joints. Suggestions are welcome - see the pictures below.


March 15, 2006

Fairing, fairing, and more fairing. Just about done though. Probably I'll paint the roof this weekend with at least 1 coat of primer.

Here's a picture of our new dinghy that I am designing for the http://boatplans-online.com/ website. It's also going to be our dinghy - 10' long, 15 HP, room for 4 real adults (and 1 Maia)

New GV10 dinghy (G V means "Garvey style , V-bottom)

February 11, 2006

Another mini-milestone reached. Last of the interior cabin lamination. Today my buddy Leighton and I completed a nice transverse foam/glass/carbon beam across the cabin roof. Nothing like working with 5.8m of wet out carbon fiber all at once. Thankfully, the strips were only 3" wide.

Then this evening it was hiking through the forest in the snow for 1/2 hr. to Hollyburn Lodge for dinner, music, and near death toboganning back to the car.

Next weekend - more bogging / sanding of the interior seams. Should be done that by end of February. Then build the cabin furniture in March / April, deck hardware end of April, and paint exterior in May or June.

January 19, 2006

Thinking of Richard Woods and Jetti Mantzke

UK. Falmouth Coastguard co-ordinates international rescue mission off Mexico
Thursday, 19 January 2006
Coastguard news:

Two people aboard a 33 foot catamaran off the coast of Mexico requested urgent
assistance in extreme weather conditions of Force 10 - 11. They battened
themselves down in the boat whilst the waves washed over their boat. The
alarm was raised at 9:30 p.m. on Wednesday evening by a transferred '999'
call from a friend who had been contacted by the crew of the British
registered catamaran 'Eclipse', informing Falmouth Coastguard that the vessel
was 90 miles from Haultuclo, in force 10. The vessel had no life raft other
than a hard dinghy, a handheld radio and flares and the EPIRB had been set
off. The two crew on board the vessel were a male from the UK and a female
from the USA. Falmouth Coastguard contacted its counterparts in America and
Mexico in order to pass co-ordination of search and rescue onto the Mexican
Coast Guard. The vessel by this time had issued a 'Mayday'.
Martin Bidmead, Falmouth Coastguard Watch Manager, says: "Rescue authorities
in Mexico were contacted through a link call with United States Coast Guard
NORFOLK and a Mexican interpreter. Mexican authorities assumed coordination.
We continued to get positional updates from the vessel. The Mexican Coast
Guard sent two 100 foot patrol boats and a helicopter to search for the
catamaran, but was unable to locate them. Fortunately an American war ship
was in the area and was able to launch a helicopter to continue the search.
The crew was told to be prepared to abandon their vessel and listen to
channel 16 and put the vessel lights on. Communications were made via
Falmouth Coastguard throughout the incident.
I am pleased to confirm that the two crew have now been air lifted by the
United States Navy and will be taken to the warship and will hopefully be
landed safely ashore in the next few days. This incident demonstrates the
international role played by Falmouth Maritime Rescue Co-ordination Centre,
working with foreign search and rescue authorities to bring about a
successful conclusion to a serious situation."